Many Food Businesses Grow in Queens

Espace 8 - Version 2
Espace 31 - Version 2


I’m writing this on a sugar high.

I’m also on a Queens high, since I have a kind of borough pride about all the awesomeness coming out of the Queens Economic Development Corporation’s E-Space Kitchen Incubator, which celebrated it’s 2nd anniversary this evening in Long Island City. The event showcased the incredible chefs and caterers which call the E-Space communal kitchen their home, and let me tell you – what they make, you should get, because it’s gooooood!

Please click on the pictures above to learn about these food visionaries, their products and their companies. Save this post for next year’s holiday gifts – Support small businesses, support Queens, and support people following their dreams.

Also worth mentioning, fellow Queens blogger Meg Cotner from We Heart Astoria, has written an unbelievably helpful resource: The Food Lovers’ Guide To Queens. I was so excited to meet and chat with her at the event tonight – she even signed my copy of her book! Which you should also buy – come eat in Queens!

Stay tuned for a future article when I follow-up on an extremely generous invitation to help one of the companies above make their product in the ESpace kitchens! Who do you think it is?!

Slow Cooker Congee: To Cook Jook

Plated JookLiving in Queens, there are ample opportunities for culinary inspiration, and dim sum brunch yesterday was merely one of those times. Heading out for dim sum means that there are many steamed buns, dumplings, and fried meat morsels in your future. However, before you get to the doughy goodness of steamed delectables, there is often an opportunity to start your day the way countless Chinese people here and abroad have started their days for centuries: with a bowl of congee.

Congee, also termed jook, is unassumingly simple. To call it porridge would turn off too many people, as would calling it rice soup or even worse, gruel, but that is essentially what it is. Rice (or sometimes another grain) is cooked in an obscene amount of water – it wouldn’t be unheard of to use a 1:10 rice:water ratio – until the rice completely breaks down and the water and rice meld together into a gloopy, gelatinous, delicious stew. Congee is most often served at breakfast, but because it is so gentle on the body, it is also a traditional healing food, served to people convalescing from fevers, viruses and illness.

But back to dim sum: the jook cart rolled by, and I gestured for a bowl. A woman ladled out simple white porridge into a simple white bowl, garnishing with a small handful of scallions. Perfection! I am a huge fan of savory breakfasts, and as soon as I tasted this jook, I knew that it was this that I must cook (I really wanted to make that rhyme once during this post). When I was studying Chinese medicine, I experimented with congee, and I have gone through phases of jooking it up since, but it’s probably been a years or so. Matthew occasionally makes whole grains for breakfast, but never this thinned-down, soupy version. So last night I took out my slow cooker and started to assemble.

Jook ingredients 1

Jook is most often cooked with white rice since it tends to break down easier than brown rice, (and the affinity for brown rice is a relatively recent phenomenon) but when cooking jook in a slow cooker overnight, brown rice is just fine. In addition to the rice and water (1:7 ratio), I threw in a cubed sweet potato, grated ginger, some dried shitake mushrooms (fresh would work fine, too), one clove of minced garlic and some salt. Congee is often used as a vehicle for healing foods, and most of the ingredients I used do have the TCM  healing properties of boosting the body’s natural energy. Long story short, while this is great to cook when you’re feeling weak or sick, it’s never NOT a good time to eat it!

Jook is gentle, nourishing and simple – it’s almost like a morning stretch, but for your digestion. Chinese medicine stresses the importance of gentle foods in the morning to avoid overwhelming the digestion, and jook does just that. 8-hours overnight on low did the trick for this lowly cup of brown rice. When I jumped out of bed to check on my jook this morning, I was thrilled with how the rice and sweet potato broke down, creating a gorgeous orange-y smooth soup. I decided to make the dish bit more substantial by topping with a poached egg, along with the requisite scallions and drizzle of sesame oil and tamari. I do tend to go more firmly in the savory direction for breakfast, but the sweet/savory combo in this dish was just what I needed this morning. If more of a sweet jook is what you’re after, throw in some walnuts, goji berries, dates or apples. If you’re craving some extra sustenance in the cold, winter months, cook the congee with a meaty bone. The possibilities really are endless. Many Asian cultures have their own version of jook, and I’m looking forward to searching Queens for more inspiration. If you cook jook at home, please comment below with your favorite combinations.

Grandma’s Sweet Pizza

It is with great sadness that I write this post, dedicated to the memory of my beloved grandmother, Lisa Meyers, who passed away peacefully on the morning of November 30th, 2012.  Grandma turned 90 in October, and up until a year or so ago, she travelled the world, went on daily walks, baked cookies, and emailed. I loved to brag about her: “my grandmother is 83 and is still cross-country skiing”, “my grandmother is 86 and just got back from Fiji or Croatia or Australia or Africa or Antarctica”…   Among the many things that Grandma was, (world traveler, home-ec teacher, family matriarch) she was a chef extraordinaire.  She had her standard dishes, which included Jewish classics like stuffed cabbage, brisket, sour cherry soup and German apple pancakes, but she wasn’t afraid of experimenting and incorporating new ingredients (she recently made biscotti with pumpkin seeds!).  While her cooking was incredible, her baking was out of this world. She made delicate flat iced cookies, crumbly powdered-sugar-coated nut crescents, apple cake, passover chocolate-walnut cake, crumb cake, and these jam bars that she called “sweet pizza”.

Grandma 20
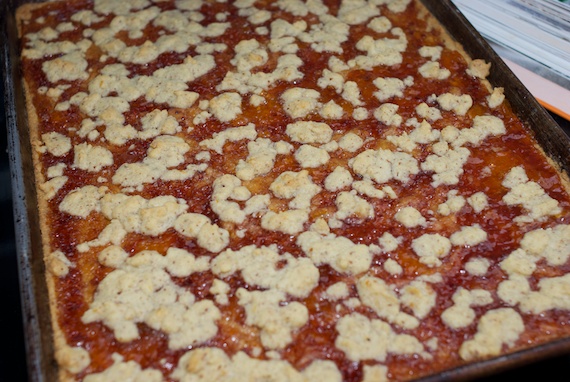
I started cooking her sweet pizza a few years ago, and when I asked her how she got her perfect crumb topping she replied “Oh, you just do like this”, as she rubbed her palms together, “it makes crumbs”. So that’s what I tried … no dice.  My topping was more clumpy, not crumby. When Grandma passed, I thought of these cookies. I knew that I would be comforted by making them, and I knew our family would be comforted by eating them, despite the fact that I knew my version would never come close to hers.  So for the first five days after her passing, I made a batch of these cookies every day, and not surprisingly, they were gone by the end of shiva each night.  So the next morning when I woke up, the first thing I did was put the butter on the counter top to let it soften.  It became my mourning ritual, and I felt a deep closeness to her as I went through each step of the recipe.

Grandma’s recipe is so simple: 3 sticks of butter, 3 cups of flour, 3/4 cups sugar and the rind of one lemon. She didn’t even list what to do with the ingredients, and she clearly omitted one essential ingredient: THE JAM!  I’ve stuck with her basic recipe, but added some chopped nuts (my theory is her version included nuts, but she omitted them when she wrote down the recipe), and I fiddled with the ratios. It’s still a work in progress, and one I’m happy to toil away on.

Grandma’s Sweet Pizza

  • 3 sticks plus 3 tablespoons butter, softened
  • 2 cups all purpose flour
  • 1 cup total roasted and ground almonds and/or hazelnuts
  • 1/2 teaspoon almond extract
  • 1/2 teaspoon vanilla extract
  • 3/4 cups sugar
  • 1/2 teaspoon salt
  • Zest of one lemon
  • 1 cup each apricot and raspberry preserves (or any other flavor)

Preheat the oven to 350F. In a large bowl, mix together flour, ground nuts and salt, set aside. Then, cream the butter with the sugar in a standing mixer on medium speed. When light and creamy, add extracts and lemon zest on low speed. Keeping the mixture on low, add the dry mixture little by little until well incorporated. Once mixed, reserve about 2 cups of the cookie dough, wrapped in plastic wrap, and place in freezer.

Spread the rest of the dough on an un-greased jellyroll pan with an offset spatula. I love this step – so meditative.

Bake (turning half-way through) for 18-20 minutes, until it’s golden brown. Cool completely.

Let’s talk jam: I tend to like raspberry jam for my cookies, unless the cookies in question are hamentashen, in which case I prefer apricot. Grandma made her’s with apricot, but since I like raspberry so much better, the first batch of sweet pizza I made that week was with raspberry. When my aunt Janet tried the cookies, she told me that when she has made the cookies, she likes to mix apricot preserves with raspberry preserves, which is what I did for the second batch, and I must say, my mind was blown. It was delicious, and it is what I would recommend.

Spread out the jam on the cooled baked dough — this is where you really see where the “sweet pizza” name comes from. Take out the frozen dough and cut into small cubes, then crumble the cubes on top of the jam. The pieces should not be uniform – big pieces, little pieces, it’s all good.

Bake, again rotating pan half-way through, for 15-20 minutes, until the crumbs are golden. Cool completely, then cut into cookies, large or small, and store in a cookie tin (this is one of her old cookie tins) for as long as it takes to eat them all, probably less than 24-hours if you have your family around.

I can’t believe I’ll never be able to ask Grandma to clarify what exactly she did so that she could merely rub her hands together and produce the most perfect, almost steusel-like topping, but I’m also fine with mine taking a permanent runner-up to her blue ribbon sweet pizza. May her memory be a blessing.
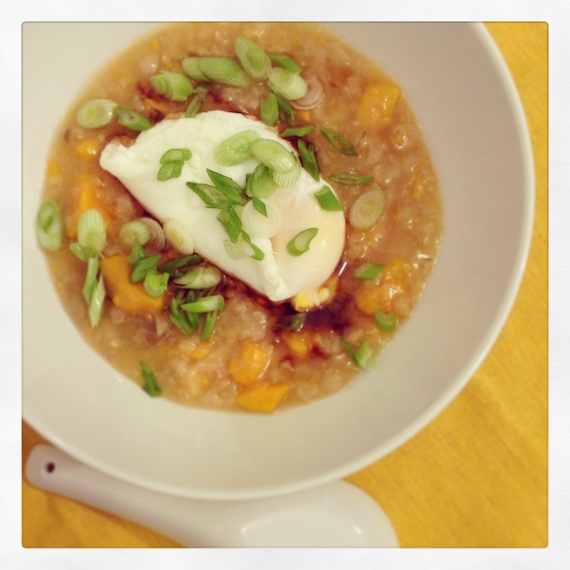
Walking


Pickles. Old school style.

As many of you know, I am a pickle-lover. But there are pickles, and there are PICKLES. Over the past few years I have been learning about the benefits of fermented pickles which differ from hot-packed and boiling-water-processed pickles which are made with vinegar and sugar. Fermented pickles are preserved through a natural process which occurs when vegetables mix with salt or brine and the resulting environment is hospitable to lactobacillus. Lactobacillus are helpful bacteria which help create many of the fermented foods we enjoy, like yogurt, sourdough bread and pickles. Adding naturally fermented and lactobacillus-rich foods into your diet helps support healthy digestion and increases the availability of some nutrients in the pickled vegetables.

I love fermented food and drinks, like wine, beer and kombucha. I always have a stash of Adamah pickles in my refrigerator and when I go to any farmer’s market and I see lactofermented ANYTHING I buy it. To support my habit, I recently started playing around with fermenting on my own. I started with the “gateway drug/ferment” of sauerkraut, and experimented with a variety of flavorings. I did a more Asian/kimchi-esque kraut with shredded ginger and hot peppers, and I did a plain one with mustard seed. Both were incredible and easy and tasty and nutritious.

If you read this blog, and followed my quest to hot-pack pickle something every month of 2010 as part of Tigress’ Can Jam, you might remember this rant/panicked post about my irrational fear of botulism.  Because I still harbor that fear, I was thrilled to learn that no one — not ONE  single person — has ever became ill from a fermented pickle! Yes, one should consume fermented products in moderation, and yes, one should be sure to wash the vegetables first and use clean jars, but according to this Fresh Air interview with fermentation guru Sandor Katz, fermentation is safe… ALWAYS! In other words, I’m in!

After experimenting with cabbage fermentation, I was ready to dive into full-vegetable pickles. I was excited to make a classic sour pickle after finding local NJ kirby cucumbers at Fairway Market. I referred to Sandor Katz’s new bible of fermenting, The Art of Fermentation, which I ordered earlier this year. I looked around to see what other ingredients I could use flavor the pickles with and came across a nice looking seranno pepper, ginger, garlic and a bunch of cilantro from my CSA (this post was started over the summer – and posted now in November. Oops.) I decided to make a Thai-flavored cucumber pickle. Sandor Katz recommends adding a tannin-rich element to the jar when pickling whole cucumbers, which tend to get mushy while they ferment because of their high water content. I didn’t do this, however, knowing that I would eat them quickly after they were done. Mine didn’t get mushy, but maybe I was just lucky and I did eat them pretty quickly. Maybe next time I will add a tanin-rich element incase it was just luck – he suggests grape leaves, oak leaves, a tea bag, or a green banana peel.

While traditional sour pickles are pickled in wooden barrels or fermentation crocks, I’ve been using large Ball jars which work just fine. For these pickles, I placed the whole, peeled garlic, sliced peppers, washed cilantro and sliced ginger on the bottom of a jar, added the scrubbed kirbies, and topped with 5% salt water brine. The ratio to make a 5% brine is 3 Tbsp of salt per liter of water. I used kosher salt, (Sandor Katz uses unrefined sea salt, but agrees that any non-iodized salt will do) and Pur-filtered and pre-boiled and cooled NYC tap water (I attempted to remove the chlorine from the NYC tap water, but it’s unclear if it was removed; the pickles didn’t seem to suffer).

Once everything was in the jar, I pressed the cucumbers down and made sure that the brine was above the top of them, loosely placed the screw-band on the jar, and kept the jar on the countertop. Every time I passed the jar over the next few days, I vented the buildup by opening the jar, pushed the cukes back down under the brine, and after about two days, I started tasting and (because I love a science experiment) testing the pH. The color of the strips changed over three and a half days from a basic green to an acidic orange and eventually yellow. The taste also became less salty and more sour. Since I was fermenting these pickles in a NYC apartment in mid-July, it took all of 4 days to fully ferment, at which point I transferred the jar to my refrigerator, from where I pulled out a kirby daily for a snack or side to my meals.

One thing to note was that some of the garlic turned bright blue during fermentation. Electric cyan not being a color one generally sees in a natural cooking environment, I turned back to Mr. Katz to see if I was going to turn all blue à la Violet Beauregard if I ate it. It turns out the blue garlic reaction is a common and HARMLESS  one which occurs due to compounds in the garlic which react to trace amounts of copper in the water.

The picture to the below left is at the beginning of the fermentation, and at the bottom right, after 4 days. You can see subtle changes in the color and texture of the vegetables. In terms of ease, fermentation is pretty hands-off and once the vegetables are prepped, a small time commitment for something so healthful and beneficial. Look for more posts about my home fermentation experiments soon and comment below on any fermentation tips or questions you have.

More reading from around the internet on fermentation:

Chipotle Sweet Potato Mash

WAIT! There is still time to make a simple, delicious, killer side for Thanksgiving! And better yet, it’s not JUST for Thanksgiving – I’ve been eating this since it became cooler a few weeks ago, and it’s become my “crack” of the season. I need it. I crave it. Thank G’d it’s easy and cheap to make, or I’d be in trouble.

Matthew made a version of this for the first meal he cooked for me, way back when. He used this recipe from Alton Brown, and I was blown away. It might even be one of the reasons I married him. Since then, we have both turned to this dish when looking for a simple, but punchy and somewhat unexpected side-dish. When I make it now, I’ve cut out the butter that Alton included in his version, and have at times played with other additions like maple syrup when I was looking for more sweetness, or garlic, or chopped herbs for freshness. One of my friends posted a request for great sweet potato recipes on Facebook today, and although this was easy enough to write in a comment back to her, I decided to post here complete with pictures.

Chipotle peppers are smoked jalapeños and they can be quite spicy. This recipe calls for chopolte peppers in adobo sauce, which are a canned item, usually stocked in the Latino section of a grocery store.

2-ingredient Chipotle Mashed Sweet Potatoes

Since we get a hefty amount of sweet potatoes from our CSA, I don’t peel them, and just merely scrub them with a clean nailbrush reserved for that purpose. Once cleaned, cut into similarly-sized pieces and steam until soft. I use a simple metal steamer basket in a Le Creuset Tagine or dutch oven, and it usually takes 5-10 minutes, depending on how large my potato chunks are.

While the potatoes are steaming, grab a Chipotle pepper from the can and chop roughly. If you are opening up a new can of peppers, throw the extras with all the sauce in a small 4-ounce jelly jar and store in the fridge. It will keep for a while, although it usually doesn’t since I am known to throw chipotle peppers in all sorts of things. Someone of the Facebook thread said that she purees them, then stores in a jar in the fridge, and I really like this idea, since you can just stick a spoon in and throw into whatever you have cooking. I know this isn’t the most appetizing picture. Don’t be dissuaded.

Once the potatoes are soft, transfer to a large bowl, add the chopped pepper and some of the marinade, and mash with whatever implement you have handy. The beauty of the steamed potatoes is that the moisture is retained and they should mash with very little effort.


Taste and season with salt if needed. I sometimes add olive oil for a bit of richness, but it’s not necessary. If you make this a day ahead, the spiciness will really emerge overnight, so beware and start with just one chipotle pepper. While best served warmed up, I’ve been known to eat it right from the fridge with a large spoon.